Welcome to Quilt Street!
Castaway Quilt

Castaway Quilt Pattern

DESIGNER: Mona M. Richards 

OWNED BY: Rhonda Lee Lother

DIFFICULTY LEVEL ‣ INTERMEDIATE

FINISHED QUILT SIZE: 
67″ x 77½” 

FINISHED BLOCK SIZE: 5″ x 5″

Instructions:

SPECIAL INSTRUCTIONS:

Read through entire pattern before beginning project. Use ¼” seam allowances with fabric right sides together. Pressing arrows are included with diagrams. Basic quilt-making supplies are assumed. 


WOF = Width of Fabric 

LOF = Length of Fabric. 


FABRIC:

Fabric A: (37) 5½” x WOF assorted strips (total 6 yards) 

Fabric B: ¾ yard yellow for binding 

Fabric C: 5 yards (for 44/45″-wide backing) or 2¾ yards (for 108″-wide backing) 


ADDITIONAL SUPPLIES:

  • Batting: 77″ x 88″ piece 
  • Marking pen/pencil (if making templates) 
  • Quilter’s template plastic (if making templates) 
  • Awl or thick needle (if making templates) 
  • Ruler with 60° marking (if rotary cutting) 


CUTTING:

From Fabric A, cut: 

• 406 assorted triangles from Castaway Template, or use strip-cutting method below. 

From Fabric B, cut: 

• (8) 2½” x WOF strips for binding 

Row Assembly

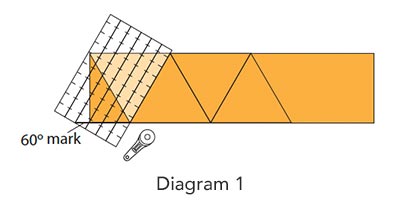
Triangles may be cut by template or by strips with a rotary cutter. To cut triangles from strip, referring to Diagram 1, place ruler over (1) 5½” x WOF strip, aligning 60° line with bottom of strip. Make an angled cut. Turn ruler and align the other 60° line with bottom of strip and ruler edge with top of strip at previous cut. Make an angled cut to make (1) Castaway Patch. Make 406. 

Castaway Quilt - diagram 1

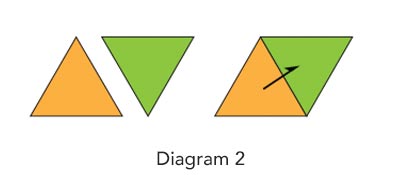
Referring to Diagram 2, place (1) Fabric A triangle over another. Align 2 corner dots. Sew from dot to dot. Open and press seam allowance to one side. Repeat, adding triangles to make 1 row with 29 triangles. Make 14 rows. 

Castaway Quilt - diagram 2

Quilt Assembly and Finishing

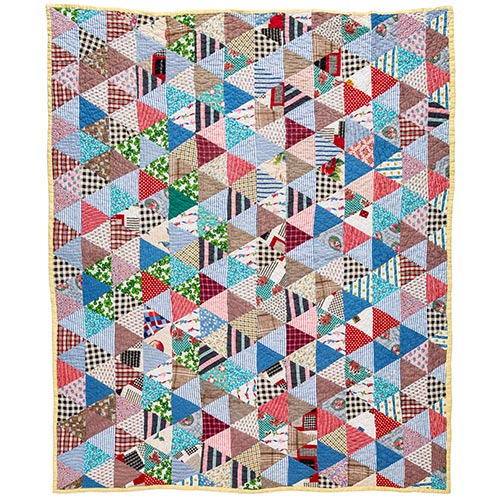
Paying attention to orientation, lay out 14 rows as shown in Quilt Assembly Diagram. Sew rows together, aligning points. Trim top and bottom edges ¼” from points to complete Castaway Quilt Top. 

Castaway Quilt - Block Assembly

  1. Trim selvage edges from 5 yards of backing fabric, fold yardage in half lengthwise, and cut into (2) 2½-yard LOF pieces. Sew pieces together along LOF; press seam to one side. 
  2. Center and layer backing, batting, and quilt top together to make a quilt sandwich. Baste layers together and quilt as desired. 
  3. Trim batting and backing even with quilt top. 
  4. Using diagonal seams, make Fabric B binding from (8) 2½” x WOF strips. Fold binding in half lengthwise, matching wrong sides; press length. Sew binding to quilt top and miter corners; join binding ends as desired. Press binding away from quilt top and fold over quilt’s edge to back of quilt. Hand-stitch binding in place to finish. 
Castaway Quilt detail

A Note on Handpiecing

If you prefer to hand-piece this quilt like Mona, you will need to make templates. Trace the Castaway Template (found in the downloadable PDF) onto template plastic. Use an awl or a thick needle to punch holes where the dots are indicated. Use the template to trace the patch on the wrong side of the fabric, remembering to mark where the dots are indicated. Use scissors or a rotary cutter to cut out patches on the drawn lines. To sew the patches together, begin with a backstitch at the start of a marked line and then weave your sewing needle through the fabric using a running stitch until you reach the next dot. Stop stitching at the second dot; do not stitch into the seam allowance. Backstitch a few times at the end point and press to one side. Once you begin stitching units together, the attention is focused on matching stitching lines instead of matching the raw edges, as you would do in machine piecing. 

Mona M. Richards

Mona M. Richards

Although she had no prior quilting experience, Mona M. Richards observed her grandmother, Effie Mae Bryant,
make quilts in Stella, Arkansas. By the 1950s, Mona had married and moved to Birmingham, Alabama. Some 10
years later, she broke her right leg. Unable to drive or sew with her sewing machine, she decided to use the down time
to make her first quilt. An experienced sewist, she used cotton scraps from the clothes she made her children for the
project. Using a simple triangle, she hand-sewed the pieces together and then hand-quilted the layers together with
utility stitching. The much-loved quilt is now owned by her youngest daughter, Rhonda Lee Lother.

Shopping Cart
Scroll to Top