Welcome to Quilt Street!
Mother's Dream Quilt - Full

Mother’s Dream Quilt Pattern

DESIGNER: Unknown 

QUILTED BY: Angela Taylor

DIFFICULTY LEVEL ‣ BEGINNER

FINISHED QUILT SIZE:
76½” x 94½” 

FINISHED BLOCK SIZE:
18″ x 18″ 

The Mother’s Dream block combines two common quilt units—the Diamond-in-the-Square and Half-Square Triangles (HSTs) to create a dynamic look. Pair the angular blocks with some soft, curvy quilting, and you’ve got a quilt that will make Mom proud! 

Michael Miller provided fabric for the backing and binding of this quilt. The backing fabric is Retro Daisies from the Ups-a-Daisy collection (sku CX10439-YELL-D), and the binding is Navigation Stripe from the Explorer collection (sku DDC10164-MULT-D). 

Instructions:

SPECIAL INSTRUCTIONS:

Read through entire pattern before beginning project. Use ¼” seam allowances with fabric right sides together. Pressing arrows are included with diagrams. Basic quiltmaking supplies are assumed. Fabric requirements include extra yardage for shrinkage and insurance. If working with directional prints, you may want to purchase more fabric than called for. Pattern is based on a vintage quilt and has been simplified as needed for ease of construction and may differ slightly from original. 

WOF = width of fabric 

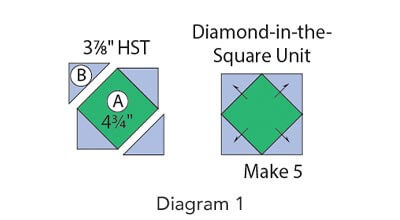
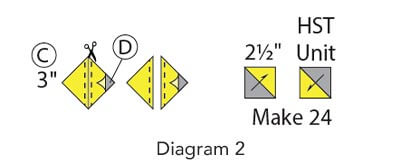
HST = half-square triangle 

LOF = length of fabric 


FABRIC:

Fabric A: 1¼ yard total assorted polka dot prints for blocks 

Fabric B: 3 yards total assorted stripe and gingham prints for blocks 

Fabric C: 4¼ yards total assorted floral prints for blocks 

Fabric D: ¾ yard total assorted solids for blocks 

Fabric E: ⅔ yard solid red for blocks and cornerstones 

Fabric F: 1⅓ yards solid green for blocks and border 

Fabric G: ⅔ yard multicolor stripe for binding 

Backing: 6⅜ yards (for 44/45″-wide) or 3 yards (for 108″-wide) 


ADDITIONAL SUPPLIES:

Batting: 86″ x 104″ piece 

Marking pencil 

CUTTING:

From Fabric A, cut: 

• (5) 4¾” x WOF strips. Cut strips into: 

• 5 sets of (5) 4¾” x 4¾” squares. 

• (3) 3″ x WOF strips. Cut strips into: 

• 3 sets of (12) 3″ x 3″ squares. 

From Fabric B, cut: 

• (5) 4¾” x WOF strips. Cut strips into: 

• 5 sets of (5) 4¾” x 4¾” squares 

• (10) 3⅞” x WOF strips. Cut strips into: 

• 10 sets of (10) 3⅞” x 3⅞” squares. Cut squares in half diagonally to make 10 sets of 20 HSTs. 

• (11) 3″ x WOF strips. Cut strips into: 

• 11 sets of (12) 3″ x 3″ squares 

From Fabric C, cut: 

• (10) 4¾” x WOF strips. Cut strips into: 

• 10 sets of (5) 4¾” x 4¾” squares 

• (10) 3⅞” x WOF strips. Cut strips into: 

• 10 sets of (10) 3⅞” x 3⅞” squares. Cut squares in half diagonally to make 10 sets of 20 HSTs. 

• (18) 3″ x WOF strips. Cut strips into: 

• 18 sets of (12) 3″ x 3″ squares 

From Fabric D, cut: 

• (8) 3″ x WOF strips. Cut strips into: 

• 8 sets of (12) 3″ x 3″ squares 

From Fabric E, cut: 

• (8) 2½” x WOF strips. Cut strips into: 

• (40) 2½” x 6½” rectangles 

• (4) 2½” x 2½” squares for border posts 

From Fabric F, cut: 

• (16) 2½” x WOF strips. Set 9 strips aside for borders. Cut 7 strips into: 

• (40) 2½” x 6½” rectangles 

From Fabric G, cut: 

• (9) 2½” x WOF strips for binding 

From Backing for 44/45″-wide, cut: 

• (2) 104″ by WOF lengths 

• (3) 6″ x WOF strips 


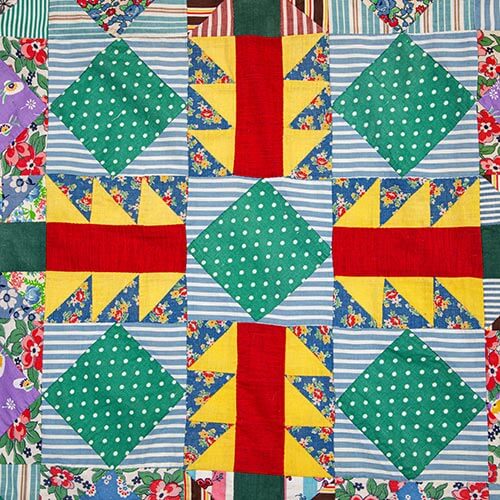
QUILT STREET TIP: We suggest using a design wall to arrange the assorted print blocks into a pleasing arrangement prior to assembly. Alternating blocks with red bars or green bars helps create balance.


Block Assembly

Referring to Diagram 1, sew (2) Fabric B HSTs to opposite sides of a Fabric A 4¾” square. Sew (2) matching Fabric B HSTs to remaining sides of Fabric A square to make Diamond-in-the-Square Unit. Make set of 5. 

Mother's Dream Block - Diagram 1

Referring to Diagram 2, draw a diagonal line on wrong side of (12) Fabric B 3″ squares. Place (1) Fabric B marked square over Fabric C 3″square. Sew a ¼” seam allowance on each side of drawn line. Cut in half on drawn line and press to make (2) HST Units. Trim to 2½” each. Make set of 24. 

Mother's Dream Block - Diagram 2

Paying attention to orientation, lay out (6) HST Units and (1) Fabric E 2½” x 6½”rectangle, as shown in Diagram 3. Sew HST Units into rows. Sew rows together to make Side Unit. Make set of 4. 

Mother's Dream Block - Diagram 3

Paying attention to orientation, lay out (5) Diamondin-the-Square Units and (4) Side Units as shown in Diagram 4. Sew together into rows. Sew rows together to make Mother’s Dream Block. Make 20 blocks, using different combinations of Fabric A/B/C 4¾” squares, Fabric B/C HSTs, Fabric B/C/D 3″ squares, and Fabric E/F rectangles as desired. 

Mother's Dream Block - Diagram 4

Quilt Assembly and Finishing

  1. Referring to Quilt Assembly Diagram, lay out (20) Mother’s Dream Blocks in 5 horizontal rows. Sew blocks together into rows. Sew rows together to complete Quilt Center. 

  2. Piecing end to end, sew together (9) 2½” x WOF Fabric F border strips to make one long strip. Cut strip into (2) 2½” x 90½” lengths. Referring to Border Assembly Diagram, sew lengths to each side of quilt top. Press toward borders. From remaining Fabric F strip, cut (2) 2½” x 72½” lengths. Sew (1) Fabric E 2½” square to each end of both Fabric F strips. Sew strips to top and bottom to complete Mother’s Dream Quilt Top. 

  1. Trim selvage edges from (2) 104″ x WOF backing pieces. Sew (3) 6″ x WOF strips together end to end. Trim to 104″ long. Place 6″-wide piece between (2) 104″ x WOF pieces and sew together along LOF; press seams to one side. 

  2. Center and layer backing, batting, and quilt top together to make quilt sandwich; baste layers together and quilt as desired. 

  3. Trim batting and backing even with quilt top. 

  4. Using diagonal seams, make Fabric G binding from (9) 2½” x WOF strips. Fold binding in half lengthwise, matching wrong sides; press length. Sew binding to quilt top and miter corners; join binding ends as desired. Press binding away from quilt top and fold over quilt’s edge to back of quilt. Hand-stitch binding in place to finish. 

Mother's Dream Block - Detail
Shopping Cart
Scroll to Top