Welcome to Quilt Street!
Claudette Quilt

Michael Miller provided the binding and backing fabric, Cotton Couture Hi-Density Cotton in Love (sku SC5333-LOVE-D), to finish the quilt. 

Claudette Quilt Pattern

DESIGNER: Unknown 

QUILTED BY: Angela Taylor

DIFFICULTY LEVEL ‣ ADVANCED

FINISHED QUILT SIZE:
76″ x 76″ 

FINISHED BLOCK SIZE: 
20½” x 20½” 

Although the Blazing Star block featured in this quilt dates as far back as 1850, it enjoyed renewed popularity in the 1930s, which is likely when this quilt top was made. Pink and green were popular color options during the Great Depression. Even in dinnerware, jadeite and pink Depression glass were available in dime stores or given away in cereal boxes or sacks of flour—which is also where the beautiful feedsack cottons were obtained. The quilt top is among the collection of one of our editors, Rhonda Lee Lother. 

Instructions:

SPECIAL INSTRUCTIONS:

Read through entire pattern before beginning project. Use ¼” seam allowances with fabric right sides together. Pressing arrows are included with illustrations. Basic quiltmaking supplies are assumed. Pattern is based on an antique quilt and has been simplified as needed for ease of construction and may differ slightly from original. 


Print template patterns at 100%, making sure your printer is set to No Scaling. Trace template patterns onto quilter’s template plastic and transfer all marks and dots. Using an awl or thick needle, poke holes through templates at dots. Place template right side down on wrong side of fabric. Trace around template and transfer dots to fabric by marking through holes with fabric pen or pencil. Cut out on marked lines. 


WOF = width of fabric 

LOF = length of fabric 

QST = quarter-square triangles 


FABRIC:

Fabric A: 22/3 yards solid white 

Fabric B: 2 yards total assorted 1930s reproduction prints 

Fabric C: ½ yard solid green for posts 

Fabric D: 2½ yards solid pink for sashing and binding 

Backing: 5 yards (for 44″-wide) or 2½ yards (for 108″-wide) fabric 


ADDITIONAL SUPPLIES:

  • Batting: 86″ x 86″ piece 
  • Quilter’s template plastic 
  • Marking pencil 
  • Awl or thick needle 


CUTTING:

From Fabric A, cut: 

• (3) 9¾” x WOF strips. Cut strips into: 

• (9) 9¾” x 9¾” squares. Cut in quarters diagonally to make 36 QSTs. 

• (6) 6½” x WOF strips. Cut strips into: 

• (36) 6½” x 6½” squares 

• (8) 25/8″ x WOF strips. Cut strips into: 

• 72 diamonds from template for block centers 

From Fabric B, cut: 

• (72) sets of 2 matching diamonds for middle row 

• (72) diamonds from template for star points 

From Fabric C, cut: 

• (2) 4″ x WOF strips. Cut strips into: 

• (16) 4″ x 4″ squares 

From Fabric D, cut: 

• (3) 21″ x WOF strips. Cut strips into: 

• (24) 4″ x 21″ rectangles for sashing strips 

• (8) 2½” x WOF strips for binding 

Block Assembly

Referring to Diagram 1, lay out (1) Fabric A center diamond, (2) matching Fabric B middle diamonds, and (1) Fabric B point diamond as shown. Place (1) Fabric B middle diamond over (1) Fabric B point diamond with right sides together and dots aligned. Sew ¼” from edge. Repeat with (1) Fabric A center and (1) Fabric B middle diamond. Sew together, aligning dots, to make (1) Point Unit. Make 72. 

Claudette Quilt, Diagram 1

Referring to Diagram 2, join (2) Point Units to make (1) Quarter Star Unit. Make 36. 

Claudette Quilt, Diagram 2

Referring to Diagram 3, lay out (4) Quarter Star Units. Join as shown to make (1) Star. Using set-in seams, sew (1) Star with (4) Fabric A corner squares and (4) Fabric A QSTs to complete (1) Claudette Block. Make 9. 
Claudette Quilt, Diagram 3

Quilt Assembly and Finishing

Referring to Quilt Assembly Diagram on page 5, lay out 3 rows of (3) Claudette Blocks with (16) Fabric C 4″ squares and (24) Fabric D 4″ x 21″ rectangles. Sew together into rows. Sew rows together to complete Claudette Quilt Top. 

Claudette Quilt, Assembly

  1. Trim selvage edges from 5 yards of backing fabric, fold yardage in half lengthwise, and cut into (2) 90″ x WOF pieces. Sew pieces together along LOF; press seam to one side. 

  2. Center and layer backing, batting, and quilt top together to make a quilt sandwich. Baste layers together and quilt as desired. 

  3. Trim batting and backing even with quilt top. 

  4. Using diagonal seams, make Fabric D binding from (8) 2½” x WOF strips. Fold binding in half lengthwise, matching wrong sides; press length. Sew binding to quilt top and miter corners; join binding ends as desired. Press binding away from quilt top and fold over quilt’s edge to back of quilt. Hand-stitch binding in place to finish. 

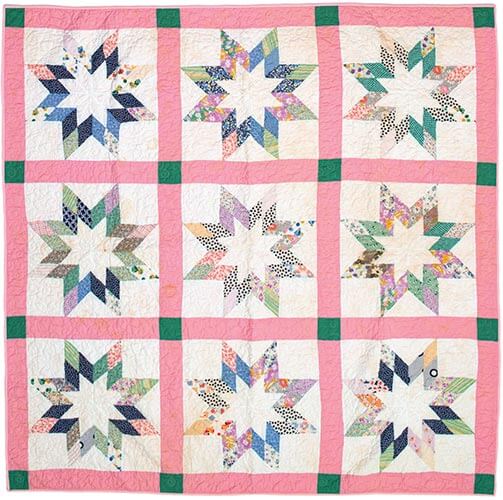
FROM AN ANTIQUE QUILT TOP TO A FINISHED QUILT:

The original quilt top had white strips around all four edges. However, they were uneven, heavily stained, and had several rusted holes in them. Our thought was that at one time, the top was pinned into a frame for quilting for a long period but never finished. Given that the other pieces in the quilt top were very accurate, it didn’t make sense that the outer white “borders” were uneven. Perhaps they were added just to hold the quilt in place of a quilting frame. With that thought in mind, we decided to remove the white borders and quilt the remainder of the top. Then it got a good washing in the machine, which took out most of the other stains. Remember to never wash a quilt top before it is quilted—it is more likely to come apart and become hopelessly misshapen before quilting.


Shopping Cart
Scroll to Top