Welcome to Quilt Street!
Thelma Louise Quilt

Thelma Louise Quilt Pattern

DESIGNER:

Thelma Louise Weaver

OWNED BY:

Rhonda Lee Lother

DIFFICULTY LEVEL ‣ 
INTERMEDIATE

FINISHED QUILT SIZE:
62″ x 65″ 

FINISHED BLOCK SIZE: 
8″ x 8″ 

This whimsical quilt block goes by a slew of names, including Windmill, Millwheel, and Water Wheel, among many others. Our instructions for this most traditional of patterns include a contemporary technique to make half-square triangle units eight at a time. With it, you begin with slightly oversize pieces and then trim to size, which helps ensure accurate blocks where the points all meet in the middle. 

Instructions:

SPECIAL INSTRUCTIONS:

Read through entire pattern before beginning project. Use ¼” seam allowances with fabric right sides together. Pressing arrows are included with diagrams. Basic quiltmaking supplies are assumed. Fabric requirements include extra yardage for shrinkage and insurance. If working with directional prints, you may want to purchase more fabric than called for. Pattern is based on an antique quilt and has been simplified as needed for ease of construction and may differ slightly from original. 

WOF = width of fabric 

HST = half-square triangle 

QST = quarter-square triangle 

LOF = length of fabric 


FABRIC:

Fabric A: 5 yards solid white for blocks, setting triangles, border, and binding 

Fabric B: 25 fat eighths (9″ x 20″) in assorted prints, or 1½ yards total, for blocks 

Backing: 4⅜ yards (for 44″/45″-wide) or 2⅛ yards (for 108″-wide) 


ADDITIONAL SUPPLIES:

Batting: 70″ x 73″ piece 

Marking pencil 


CUTTING:

From Fabric A, cut: 

• (2) 12⅝” x WOF strips. Cut strips into: 

• (4) 12⅝” x 12⅝” squares. Cut squares diagonally twice to make 16 QSTs. 

• (2) 6⅝” x 6⅝” squares. Cut squares in half once diagonally to make 4 HSTs. 

• (4) 8½” x WOF strips. Cut strips into: 

• (16) 8½” x 8½” squares 

• (9) 6″ x WOF strips. Cut strips into: 

• (50) 6″ x 6″ squares 

• (4) 4½” x WOF strips for borders 

• (4) 3″ x WOF strips for borders 

• (8) 2½” x WOF strips for binding 

From Fabric B, cut: 

• (25) 6″ x 12″ rectangles. Cut rectangles into: 

• (50) 6″ x 6″ squares 

Block Assembly

Referring to Diagram 1, draw diagonal lines in both directions to make an X on wrong side of (50) Fabric A 6″ squares. Place a Fabric A square over a Fabric B square. Sew a ¼” seam allowance on each side of drawn lines. Using center of the X as a guide, cut sewn squares horizontally and vertically into 4 portions. Cut each portion along drawn lines to make (8) HST Units. Trim to 2½” square. Repeat with second Fabric A and matching Fabric B 6″ squares to make set of (16) HST Units. Make 25 sets of (16) HST Units. 
Thelma Louise Quilt, Diagram 1

Paying attention to orientation, lay out (4) HST Units in 2 rows as shown in Diagram 2. Sew together into rows. Sew rows together to make Pinwheel Unit. Make 4. Stitch (4) Pinwheel Units into 2 rows of 2 each and then stitch rows together to make Pinwheel Block. Make 25. 
Thelma Louise Quilt, Diagram 2

Quilt Assembly and Finishing

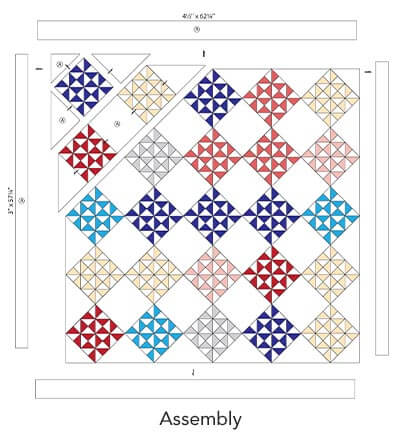
  1. Referring to Quilt Assembly Diagram on page 5, lay out (25) Pinwheel Blocks, (16) Fabric A 8½” squares, and (16) Fabric A QSTs in 9 diagonal rows as shown. Sew blocks, squares, and QSTs together into rows. Sew rows together. Join (4) Fabric A HSTs to corners to make Quilt Center.
  2. Piecing end to end, sew together (4) 3″ x WOF Fabric A border strips to make one long strip. Cut strip into (2) 3″ x 57¼” lengths. Sew lengths to each side of quilt top. Press toward borders. Piecing end to end, sew together (4) 4½” x WOF Fabric A border strips to make one long strip. Cut strip into (2) 4½” x 62¼” lengths. Sew strips to top and bottom to complete Thelma Louise Quilt Top. 

Thelma Louise Quilt, Assembly

  1. Trim selvage edges from 43/8 yards of backing fabric, fold yardage in half lengthwise, and cut into (2) 78″ LOF pieces. Sew pieces together along LOF; press seam to one side. (Seam will be vertical on quilt backing.) 

  2. Center and layer backing, batting, and quilt top together to make a quilt sandwich; baste layers together and quilt as desired. Trim batting and backing even with quilt top. 

  3. Using diagonal seams, make Fabric A binding from (8) 2½” x WOF strips. Fold binding in half lengthwise, matching wrong sides; press the length. Sew binding to quilt top and miter corners; join binding ends as desired. Press binding away from quilt top and fold over quilt’s edge to back of quilt. Hand-stitch binding in place to finish. 

Thelma Louise Weaver

Thelma Louise Weaver

This quilt is named for its creator, Thelma Louise Weaver of Middletown, Ohio. Affectionately known as Granny Weaver, she was a longtime member of the quilters guild at Christ United Methodist Church in Middletown, Ohio. She made this quilt in the 1940s for her son, William B. Weaver of Dalton, Georgia, and it is now in the collection of his niece, Rhonda Lee Lother. Interestingly, she sewed plain white fabric at the top and bottom of the quilt as “chin tucks” to save oils and dirt from getting on the quilt. She wrote “Weaver” in the lower left edge in permanent pen. Rhonda has since made a quilt label that documents the quilt’s provenance. The quilt has been much-loved and much-used, so some blocks have faded to the point of being barely visible. They could have been green; in older examples of green fabric, the blue sometimes faded, leaving yellow behind.

Shopping Cart
Scroll to Top