
Choose 1 set each Fabric A and Fabric B sets. Referring to Diagram 1, draw a diagonal line on wrong side of (2) Fabric A 4″ squares. Place marked square over (1) Fabric B 4″ square. Sew a ¼” seam allowance on each side of drawn line. Cut in half on drawn line and press to make (2) HST Units. Trim to 3½” each. Make 4. Paying attention to orientation, sew (1) Fabric A 3⅞” HST to each side of (1) HST Unit as shown to make (1) Corner Unit. Make 4.

Fold in half long side of (1) Fabric A 3⅝” HST and gently finger-press center point. In the same manner, fold in half one side of (1) Fabric B 4⅜” square and finger-press center point. Match folded center points, pin, and sew together as shown in Diagram 2. In the same manner, sew a Fabric A triangle to opposite side. Sew triangles to remaining two sides to make Economy Patch Unit.

Referring to Diagram 3, lay out Economy Patch Unit with (4) Fabric A 2″ squares and (4) Fabric B 2″ x 6″ rectangles. Sew 2 rectangles to opposite sides of Economy Patch Unit. Sew (1) 2″ square to each end of remaining rectangles. Sew together complete Center Unit. 
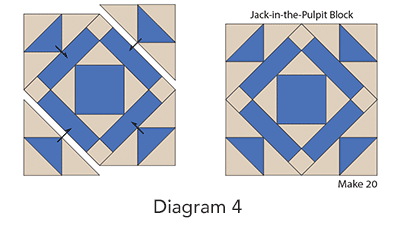
Paying attention to orientation, lay out (4) Corner Units and Center Unit as shown in Diagram 4. Sew Corner Units to opposite sides of Center Unit. Sew Corner Units to opposite sides to make Jack-in-the-Pulpit Block. Make 20 blocks in assorted combinations.
We love that the quiltmaker embroidered her name in the corner. Today, many quiltmakers include a quilt label on the back with their name, date, sometimes where they live, and for whom the quilt was made. This antique quilt shows that it is also okay to include information on the front.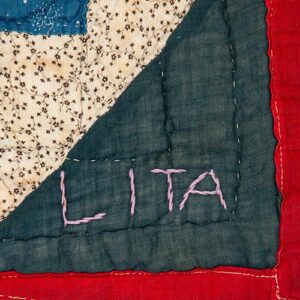
Referring to Quilt Assembly Diagram, lay out (20) Jack-in-the-Pulpit Blocks, (12) Fabric C 12½” setting squares, (14) Fabric C QST side setting triangles, and (4) Fabric C HST corner setting triangles. Sew into diagonal rows; sew rows together to complete Quilt Top. Press seam allowances to Fabric C. Trim setting triangles as needed ¼” from points. Quilt Assembly Diagram

Trim selvage edges from 5⅜ yards backing fabric yardage, fold yardage in half lengthwise, and cut into two LOF pieces. Sew pieces together along LOF; press seam to one side.
Center and layer backing, batting, and quilt top together to make quilt sandwich; baste layers together and quilt as desired.
Trim batting and backing even with quilt top.
Using diagonal seams, make Fabric D binding from (8) 2½” x WOF strips. Fold binding in half lengthwise, matching wrong sides; press length. Sew binding to quilt top and miter corners; join binding ends as desired. Press binding away from quilt top and fold over quilt’s edge to back of quilt. Hand-stitch binding in place to finish.