Welcome to Quilt Street!
Bright Hopes Block

Bright Hopes Block

DIFFICULTY LEVEL ‣ BEGINNER

FINISHED BLOCK SIZE: 9″ x 9″ 

The Bright Hopes block provides a wonderful opportunity to learn set-in seams. It’s not as scary as it sounds; the block only has one set-in seam. The first rectangle (shown in purple above) is sewn to the center square only halfway down, and then the remaining rectangles are added to each side in a manner similar to Log Cabin. After the bottom rectangle is sewn on, then the rest of the purple rectangle is sewn in place. This is also a great block for using up scraps! 

Instructions:

SPECIAL INSTRUCTIONS:

Read through entire pattern before beginning project. Use ¼” seam allowances with fabric right sides together. Pressing arrows are included with illustrations. Fabric requirements include extra yardage for shrinkage and insurance. If working with directional prints, you may want to begin with more fabric than called for. 


FABRIC:

Fabric A: (1) 3½” x 3½” square white fabric 

Fabric B: (1) 3½” x 6½” rectangle purple fabric 

Fabric C: (1) 3½” x 6½” rectangle green fabric 

Fabric D: (1) 3½” x 6½” rectangle red fabric 

Fabric E: (1) 3½” x 6½” rectangle blue fabric 

Block Assembly:

Referring to Diagram 1, align edges of Fabric A 3½” square and Fabric B 3½” x 6½” rectangle. Sew from center of Fabric A square to top edge, creating a partial seam. 
Bright Hopes Block, Diagram 1

Sew Fabric C 3½” x 6½” rectangle to top edge, as shown in Diagram 2. 
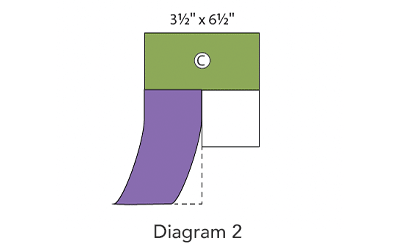
Bright Hopes Block, Diagram 2


Referring to Diagram 3, sew Fabric D 3½” x 6½” rectangle to side. 
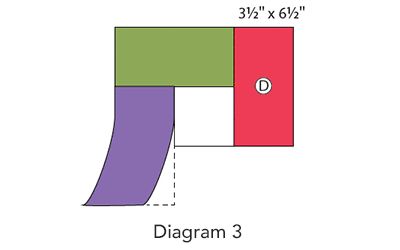
Bright Hopes Block, Diagram 3


Referring to Diagram 4, sew Fabric E 3½” x 6½” rectangle to bottom edge. Sew from partial seam to outside edge of block to make Bright Hopes Block. 

Bright Hopes Block, Diagram 4


Shopping Cart
Scroll to Top