Flying Geese Block
DIFFICULTY LEVEL ‣ INTERMEDIATE
FINISHED BLOCK SIZE: 10″ x 10″
Not surprisingly, this block is made up of Flying Geese units surrounding a small, central square. With points going north, south, east, and west, the whirling block creates dynamic movement.
Instructions:
SPECIAL INSTRUCTIONS:
Read through entire pattern before beginning project. Use ¼” seam allowances with fabric right sides together. Pressing arrows are included with illustrations. Fabric requirements include extra yardage for shrinkage and insurance. If working with directional prints, you may want to begin with more fabric than called for.
WOF = width of fabric
FABRIC:
Fabric A: (1) 5½” x WOF strip white fabric
Fabric B: (1) 3″ x 20″ strip light blue fabric
Fabric C: (1) 3″ x 20″ strip medium blue fabric
Fabric D: (1) 3″ x 20″ strip dark blue fabric
ADDITIONAL SUPPLIES:
Marking pencil
CUTTING:
From Fabric A, cut:
• (2) 2½” x WOF strips. Cut strips into:
• (25) 2½” x 2½” squares
From Fabric B, cut:
• (4) 2½” x 4½” rectangles
From Fabric C, cut:
• (4) 2½” x 4½” rectangles
From Fabric D, cut:
• (4) 2½” x 4½” rectangles
Instructional Video:
Fabrics are from the Cheddar & Coal II Collection by Marcus Fabrics.
Block Assembly:
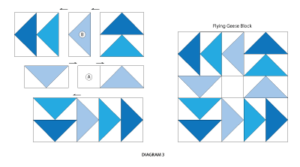
Referring to Diagram 1, draw a diagonal line on wrong side of (2) Fabric A 2½” squares. Place 1 marked square on one end of Fabric B 2½” x 4½” rectangle as shown. Sew on drawn line and trim away excess fabric with a ¼” seam allowance. Press open. Repeat on opposite end of rectangle to make Flying Geese Unit. Make 4. In the same manner, make 4 with Fabric C and 4 with Fabric D.

Referring to Diagram 2, lay out (1) Fabric C and (1)
Fabric D Flying Geese Unit. Sew together to make Corner Unit. Make 4.

Paying attention to orientation, lay out (4) Corner
Units, (4) Fabric B Flying Geese Units, and (1) Fabric A 2½” square as shown. Sew into rows. Sew rows together to make Flying Geese Block.
