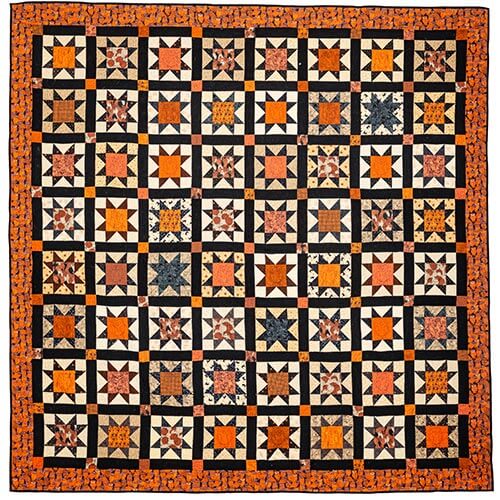
Fright Night Quilt Pattern
DESIGNER: Rhonda Lee Lother
QUILTED BY: Roy Colley
DIFFICULTY LEVEL ‣ INTERMEDIATE
FINISHED QUILT SIZE: 90½” x 90½”
FINISHED BLOCK SIZE: 8″ x 8″
When ghosts, goblins, black cats, and jack-o’-lanterns appear—at least in our fabric collections—you know that Fright Night is right around the corner! The Sawtooth Star blocks in this quilt provide a wonderful opportunity to showcase your favorite Halloween novelty prints. This quilt is sized for a queen-size bed, and for pulling the covers over your head during a scary movie!
Instructions:
SPECIAL INSTRUCTIONS:
Read through entire pattern before beginning project. Use ¼” seam allowances with fabric right sides together. Pressing arrows are included with illustrations. Fabric requirements include extra yardage for shrinkage and insurance. If working with directional prints, you may want to begin with more fabric than called for.
WOF = width of fabric
LOF = length of fabric
HST = half-square triangle
FABRIC:
Fabric A: 64 assorted 6″ x 20″ pieces tan prints (5½ yards total)
Fabric B: 64 assorted 3″ x 20″ pieces black prints (3 yards total)
Fabric C: 64 assorted 5″ x 8″ pieces orange novelty prints (2 yards total)
Fabric D: 3½ yards solid black for sashing and binding
Fabric E: 1½ yards orange novelty print for border (or 2½ yards for directional print)
Backing: 2¾ yards (for 108″-wide) fabric
ADDITIONAL SUPPLIES:
Batting: 100″ x 100″ piece
Marking pencil for dark fabric
CUTTING:
From Fabric A, cut:
• (64) sets of:
• (4) 2½” x 4½” rectangles
• (4) 2½” x 2½” squares
From Fabric B, cut:
• (64) sets of:
• (8) 2½” x 2½” squares
From Fabric C, cut:
• (64) 4½” x 4½” assorted squares
• (81) 2½” x 2½” assorted squares
From Fabric D, cut:
• (36) 2½” x WOF Strips. Cut strips into:
• (144) 2½” x 8½” rectangles
• (10) 2½” x WOF strips for binding
From Fabric E, cut:
• (10) 4½” x WOF strips for borders (nondirectional print)
• If using a directional print, use alternate yardage and cut:
• (2) 4½” x LOF side border strips.
• From remainder, cut (6) 4½” x WOF strips for top and bottom borders.
Block Assembly:
Choose 1 set each of (4) Fabric A 2½” x 4½” rectangles, (8) Fabric B 2½” squares, and (1) Fabric C 4½” square. Referring to Diagram 1, draw a diagonal line on wrong side of (8) Fabric B 2½” squares. Place 1 marked square on one end of Fabric A 2½” x 4½” rectangle as shown. Sew on drawn line and trim away excess fabric with a ¼” seam allowance. Repeat on opposite end of rectangle to make Flying Geese Unit. Make 4. 
Paying attention to orientation, lay out (4) Fabric A 2½” squares, (4) Flying Geese Units, and (1) Fabric C 4½” square as shown in Diagram 2. Sew into rows. Sew rows together to make Sawtooth Block. Make 64.

Quilt Assembly and Finishing
- Referring to Quilt Assembly Diagram, lay out 8 horizontal rows of 8 blocks each with (81) Fabric C 2½” squares and (144) Fabric D 2½” x 8½” rectangles. Sew into rows. Sew rows together to make Quilt Center.
Nondirectional border print: Piecing end-to-end, sew together (10) Fabric E 4½” x WOF border strips to make one long strip. Cut strip into (2) 4½” x 82½” lengths. Referring to Border Assembly Diagram, sew lengths to each side of quilt top. Press toward Fabric E. From remaining strip, cut (2) 4½” x 90½” lengths. Sew to top and bottom to complete Fright Night Quilt Top.
If you are using a directional border print, trim (2) Fabric E 4½” x LOF strips to 4½” x 82½“. Sew to sides of quilt, pressing toward Fabric E. Piecing end-to-end, sew together (3) Fabric E 4½” x WOF border strips, matching patterns where possible. Cut strip into (1) 4½” x 90½” strip for top border. Repeat for bottom border. Sew to top and bottom of quilt to complete Fright Night Quilt Top.

Trim selvage edges from backing fabric. Center and layer backing, batting, and quilt top together to make a quilt sandwich; baste layers together and quilt as desired.
Trim batting and backing even with quilt top.
Using diagonal seams, make Fabric D binding from (10) 2½” x WOF strips. Fold binding in half lengthwise, matching wrong sides; press length. Sew binding to quilt top and miter corners; join binding ends as desired. Press binding away from quilt top and fold over quilt’s edge to back of quilt. Hand-stitch binding in place to finish.
