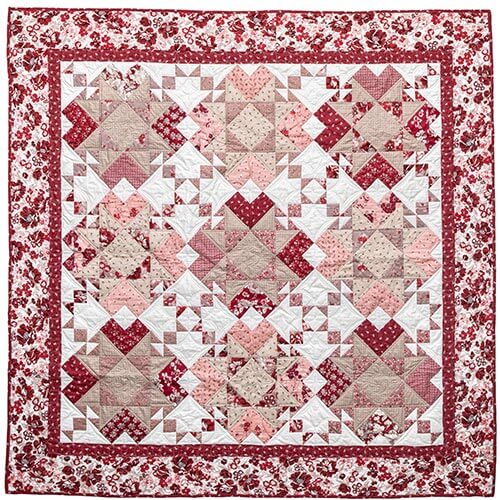
Fabrics used are from the Heartfelt collection by Gerri Robinson of Planted Seed Designs for Riley Blake Designs.
Hidden Stars Quilt Pattern
DESIGNER: Gerri Robinson of Planted Seed Designs
QUILTED BY: Penny Barnes of PB&J Quilt Studio
DIFFICULTY LEVEL ‣ INTERMEDIATE
FINISHED QUILT SIZE: 76½” x 76½”
FINISHED BLOCK SIZE: 20″ x 20″
The longer you gaze at this lovely quilt, the more hidden secrets it reveals. At first glance, you may see hidden stars. But look deeper, and you may see hearts or arrows. Even the fabrics used sound romantic—they are from the Heartfelt collection by Riley Blake Designs. We’re smitten by this beauty, which is just the right size to hug someone you love.
Instructions:
SPECIAL INSTRUCTIONS:
Read through entire pattern before beginning project. Use ¼” seam allowances with fabric right sides together. Pressing arrows are included with illustrations. Basic quiltmaking supplies are assumed.
WOF = width of fabric
LOF = length of fabric
HST = half-square triangle
FABRIC:
Fabric A: (9) ½-yard cuts assorted tan prints
Fabric B: (9) ½-yard cuts assorted dark tan/rose prints
Fabric C: 2 yards white solid
Fabric D: (9) ½-yard cuts assorted dark rose and tan prints
Fabric E: 1⅓ yards burgundy print for inner border and binding
Fabric F: 1⅔ yards burgundy and white floral print for
outer border
Backing: 5 yards of 44/45″-wide fabric or 2½ yards (for 108″ wide fabric)
ADDITIONAL SUPPLIES:
- Batting: 86″ x 86″ piece
- Marking pencil
CUTTING:
From Fabric A, cut:
• (9) sets of:
• (1) 8½” x 8½” square for center
• (8) 4½” x 4½” squares for side units
From Fabric B, cut:
• (9) sets of:
• (4) 4½” squares for center
• (16) 2½” x 2½” squares for corners
From Fabric C, cut:
• (25) 2½” x WOF strips. Cut strips into:
• (72) 2½” x 4½” rectangles
• (252) 2½” x 2½” squares
From Fabric D, cut:
• (9) sets of:
• (4) 4½” x 8½” rectangles for side units
• (8) 2½” x 4½” rectangles for side units
From Fabric E, cut:
• (7) 2½” x WOF strips for inner border
• (8) 2½” x WOF strips for binding
From Fabric F, cut:
• (8) 6½” x WOF strips for outer border
Block Assembly:
Referring to Diagram 1, draw a diagonal line on wrong side of (4) Fabric B 4½” squares. Place 1 marked square on one corner of Fabric A 8½” square as shown. Sew on drawn line and trim away excess fabric with a ¼” seam allowance. Repeat on opposite corner. Repeat on remaining corners to make Center Unit.

Referring to Diagram 2, draw a diagonal line on wrong side of (1) Fabric C 2½” square. Place marked square over (1) Fabric B 2½” square. Sew ¼” seam allowance on each side of drawn line. Cut in half on drawn line and press to make (2) HST Units. Make 8. Draw a diagonal line on wrong side of (1) Fabric B 2½” square. Place marked square over right end of (1) Fabric C 2½” x 4½” rectangle. Sew on drawn line and trim away excess fabric with a ¼” seam allowance. Open and press to make Left Side Rectangle. Make 4 Left and 4 Right Side Rectangles. Paying attention to orientation, lay out (2) HST Units, (1) of each Side Rectangles, (2) Fabric C 2½” squares, and (1) Fabric B 2½” square. Sew together into units; sew rows together to make Corner Unit. Make 4.

Referring to Diagram 3, draw a diagonal line on wrong side of (2) Fabric A 4½” squares. Place 1 marked square on one end of Fabric D 4½” x 8½” rectangle as shown. Sew on drawn line and trim away excess fabric with a ¼” seam allowance. Repeat on opposite end of rectangle to make Large Flying Geese Unit. Make 4. Repeat with Fabric C 2½” squares and Fabric D 2½” x 4½” rectangles to make Small Flying Geese Unit. Make 8. Lay out (1) Large and (2) Small Flying Geese Units as shown. Sew together to make Side Unit. Make 4.
Paying attention to orientation, lay out Center Unit, (4) Corner Units, and (4) Side Units (Diagram 4). Sew into rows. Sew rows together to make Hidden Star Block. Make 9. 
Quilt Assembly and Finishing
- Lay out 9 Hidden Star Blocks as shown in Quilt Assembly Diagram. Sew into rows. Sew rows together to make Quilt Center.
- Piecing end to end, sew together (7) Fabric E 2½” x WOF border strips to make one long strip. Cut strip into (2) 2½” x 60½” lengths. Referring to Quilt Assembly Diagram, sew lengths to each side of quilt top. Press toward Fabric E. From remaining strip, cut (2) 2½” x 64½” lengths. Sew to top and bottom. In a similar manner, sew together (8) Fabric F 6½” x WOF strips. Cut strip into (2) 6½” x 64½” lengths. Sew lengths to sides of quilt. Press toward Fabric F. From remaining strip, cut (2) 6½” x 76½” lengths. Sew to top and bottom to complete Hidden Stars Quilt Top.

Trim selvage edges from 5 yards of backing fabric, fold yardage in half lengthwise, and cut into (2) 2½-yard x WOF pieces. Sew pieces together along LOF; press seam to one side.
Center and layer backing, batting, and quilt top together to make quilt sandwich; baste layers together and quilt as desired.
Trim batting and backing even with quilt top.
Using diagonal seams, make Fabric E binding from (8) 2½” x WOF strips. Fold binding in half lengthwise, matching wrong sides; press length. Sew binding to quilt top and miter corners; join binding ends as desired. Press binding away from quilt top and fold over quilt’s edge to back of quilt. Hand-stitch binding in place to finish.

Gerri Robinson
Gerri Robinson started Planted Seed Designs in 2005 after a career in sales and marketing. She had been quilting for seven years when she decided to take the next step and begin creating her own designs. She is a fabric designer for Riley Blake Designs, a quilt and pattern designer for Planted Seed Designs, and a published author of quilt books.
“Planted Seed Designs comes from that part of me that loves a classic, traditional look in fabrics and quilts,” Gerri says. “I try to capture that classic feel in my fabric designs by updating reproduction prints in colors and scales that work in today’s home décor. My quilt designs lean toward the classic, too, with an emphasis on stars and pinwheels, my two favorite block elements. Although I spend most of my time designing for Planted Seed Designs, I also enjoy designing outdoor
spaces and garden beds, and—unlike most people—finding ways to take the indoors out. In my opinion, a tufted cushion on a garden bench or a quilt tossed over a lounge chair makes a beautiful space even more special.”
She adds, “If I’m not in the studio or in the garden, you might find me on a road trip with my
husband, Eric, and our dog, Riley, heading off to visit one of our sons: Andrew in Tucson, Josh in
Phoenix, or Michael and his family in Indianapolis. It’s a good life!”
