
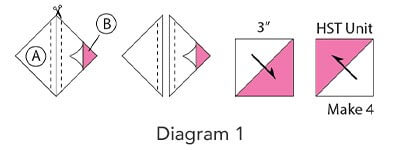
Referring to Diagram 1, draw diagonal line on wrong side of (2) Fabric A 3½” squares. Place Fabric A 3½” square over Fabric B 3½” square. Sew a ¼” seam allowance on each side of drawn line. Cut in half on drawn line and press to make (2) HST Units. Trim to 3″. Make 4.
Paying attention to orientation, lay out (4) HST Units, (4) Fabric A 3″ squares, and (1) Fabric B 3″ square as shown in Diagram 2. Sew into rows. Sew rows together to make Shoo Fly Block. Make 28.

A quick and easy way to sort a collection of fabric into relative color values is to take a picture of the fabric collection with your smartphone. Use the photo editing feature to view the fabrics in monochrome and sort them from light to dark.
- Referring to Quilt Assembly Diagram, lay out (28) Shoo Fly Blocks and (28) Fabric A 8″ squares. Sew together into rows. Sew rows together to make Quilt Center.
- Piecing end-to-end, sew together (6) Fabric B 2″ x WOF strips to make one long strip. Cut strip into (2) 2″ x 53″ lengths. Sew lengths to top and bottom of Quilt Center; press. Cut remaining strip cut (2) 2″ x 63½” lengths. Sew lengths to sides of Quilt Center.
- In a similar way, join (7) Fabric A 3½” x WOF strips. Cut strip into (2) 3½” x 56″ top and bottom border strips and (2) 3½” x 69½” side border strips. Add top and bottom borders first and then side borders, pressing toward darker fabric.
- Sew together remaining (7) Fabric B 2″ x WOF strips. Cut (2) 2″ x 62″ top and bottom border 3 strips and (2) 2″ x 72½” side border 3 strips. Sew borders to quilt, top and bottom first and then sides. Press seams toward darker fabric.

- Trim selvage edges from 4⅞ yards of backing fabric, fold yardage in half lengthwise, and cut into (2) 85½” x WOF backing fabric pieces. Sew pieces together along LOF; press seam to one side.
- Center and layer backing, batting, and quilt top together to make a quilt sandwich; baste layers together and quilt as desired.
- Trim batting and backing even with quilt top.
- Using diagonal seams, make Fabric B binding from (8) 2½” x WOF strips. Fold binding in half lengthwise, matching wrong sides; press length. Sew binding to quilt top and miter corners; join binding ends as desired. Press binding away from quilt top and fold over quilt’s edge to back of quilt. Hand-stitch binding in place to finish.