Pinwheel Block
DIFFICULTY LEVEL ‣ INTERMEDIATE
FINISHED BLOCK SIZE: 8″ x 8″
This whimsical quilt block goes by a slew of names, including Windmill, Millwheel, and Water Wheel, among many others. Our instructions for this most traditional of patterns include a contemporary technique to make half-square triangle units eight at a time. With it, you begin with slightly oversize pieces and then trim to size, which helps ensure accurate blocks where the points all meet in the middle.
Instructions:
SPECIAL INSTRUCTIONS:
Read through entire pattern before beginning project. Use ¼” seam allowances with fabric right sides together. Pressing arrows are included with diagrams. Basic quiltmaking supplies are assumed. Fabric requirements include extra yardage for shrinkage and insurance. If working with directional prints, you may want to begin with more fabric than called for.
HST = half-square triangle
FABRIC:
Fabric A: 1 fat eighth (9″ x 20″) white
Fabric B: 1 fat eighth (9″ x 20″) blue print
ADDITIONAL SUPPLIES:
Marking pencil
CUTTING:
From Fabric A, cut:
• (2) 6″ x 6″ squares
From Fabric B, cut:
• (2) 6″ x 6″ squares
Block Assembly:
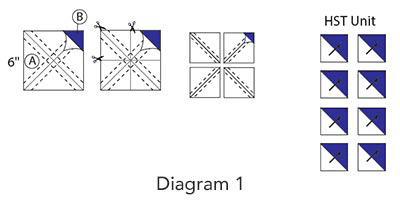
Referring to Diagram 1, draw diagonal lines in both directions to make an X on wrong side of (1) Fabric A 6″ square. Place a Fabric A square over (1) Fabric B square. Sew a ¼” seam allowance on each side of drawn lines. Using center of the X as a guide, cut sewn squares horizontally and vertically into 4 portions. Cut each portion along drawn lines to make (8) HST Units. Trim to 2½” square. Repeat with second Fabric A 6″ square and Fabric B 6″ square to make set of (16) HST Units.

Paying attention to orientation, lay out (4) HST Units in 2 rows as shown in Diagram 2. Sew together into rows. Sew rows together to make Pinwheel Unit. Make 4. Stitch (4) Pinwheel Units into 2 rows of 2 each and then stitch rows together to make Pinwheel Block.
