
SPECIAL INSTRUCTIONS:
Read through entire pattern before beginning project. Use ¼” seam allowances with fabric right sides together. Pressing arrows are included with illustrations. Fabric requirements include extra yardage for shrinkage and insurance. If working with directional prints, you may want to begin with more fabric than called for. Pattern is based on an antique quilt and has been simplified as needed for ease of construction and may differ slightly from original.
WOF = width of fabric
LOF = length of fabric
FABRIC:
Fabric A: 25 fat quarters (18″ x 20″) [6¼ yards total] assorted medium tan prints for arc backgrounds
Fabric B: 25 fat quarters (18″ x 20″) [6¼ yards total] assorted medium/dark prints for arc points
Fabric C: 2¾ yards light tan for arcs, center squares, and binding
Fabric D: 25 fat eighths (9″ x 20″) (3⅛ yards total) assorted dark prints for center templates
Fabric E: 2¼ yards medium tan print for sashing and borders
Backing: 5 yards (for 44/45″) fabric or 2½ yards (108″-wide) fabric
ADDITIONAL SUPPLIES:
Batting: 86″ x 86″ piece
CUTTING:
• 25 sets of (24) 3″ x 3″ squares
From Fabric B, cut:
• 25 sets of (20) 3″ x 3″ squares
From Fabric C, cut:
• (3) 4″ x WOF strips. Cut strips into:
• (25) 4″ x 4″ squares
• (13) 4½” x WOF strips. Cut strips into:
• (100) Template B
• (8) 2½” x WOF strips for binding
From Fabric D, cut:
• (25) sets of (4) Template C
From Fabric E, cut:
• (7) 2½” x WOF strips. Cut strips into:
• (20) 2½” x 12½” vertical sashing strips
• (7) 2½” x WOF strips. Sew together end to end and cut into:
• (4) 2½” x 68½” horizontal sashing strips
• (8) 4½” x WOF strips for borders

Print (1) Arc Template and verify print size. Print 100 total Arc Templates. Printed side of Arc Template is the sewing side, and rectangles are placed right sides together on the unprinted side, aligning with each new stitching line. Choose 1 set each Fabrics A and B for Arcs. Place (1) Fabric A 3″ square over (1) Fabric B 3″ square with right sides together and raw edges aligned. Referring to Diagram 1, from the back, align squares with first seam line on paper Arc Template, allowing ¼” to extend past line. Sew on the line, then turn over and flip Fabric B along seam line so that right sides are open and seam allowance is covered. Finger-press in place. Continue, alternating Fabrics A and B as marked on the template, and trimming excess fabric as needed. When complete, trim excess fabric from Arcs, remove paper, and press to make (1) Arc. Make 4 matching Arcs.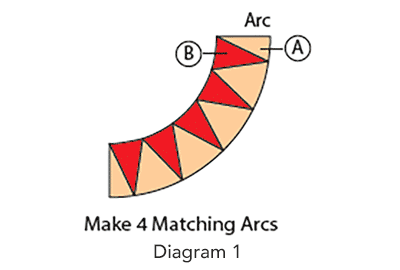
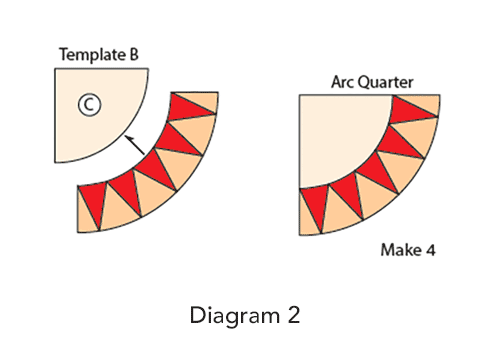
Sew (1) Fabric C Template B to inner curve of (1) Arc to make (1) Arc Quarter. Make 4.
Referring to Diagram 3, lay out (4) Arc Quarters with (1) Fabric C 4″ square and (4) Fabric D Template C. Sew (1) Template C to each side of (1) Fabric C square to make Center. Sew each Arc Quarter to Center piece using curved piecing to complete (1) Suspension Bridge Block. Make 25 blocks in assorted combinations.

Referring to Quilt Assembly Diagram, lay out (25) Suspension Bridge Blocks, (20) 2½” x 12½” vertical sashing strips, and (4) 2½” x 68½” horizontal sashing strips. Sew blocks and vertical sashing strips into rows, pressing seams to sashing strips. Sew rows together with horizontal sashing strips to complete quilt center.
Piecing end to end, sew together (8) 4½” x WOF
Fabric E border strips to make one long strip. Cut strip into (2) 4½” x 68½” lengths. Sew lengths to each side of quilt top. Press toward borders. Cut remaining strips into (2) 4½” x 76½” lengths. Sew lengths to top and bottom of quilt to complete Suspension Bridge Quilt Top.

Trim selvage edges from 5 yards of backing fabric, fold yardage in half lengthwise, and cut into (2) 90″ x LOF pieces. Sew together along LOF; press seams to one side.
Center and layer backing, batting, and quilt top together to make a quilt sandwich; baste layers together and quilt as desired.
Trim batting and backing even with quilt top.
Using diagonal seams, make Fabric C binding from (8) 2½” x WOF strips. Fold binding in half lengthwise, matching wrong sides; press length. Sew binding to quilt top and miter corners; join binding ends as desired. Press binding away from quilt top and fold over quilt’s edge to back of quilt. Hand-stitch binding in place to finish.
This block uses paper piecing to create accurate arcs for the block units. Choose a lightweight paper that will fit your printer, and remember that you will be sewing with the fabric on the bottom and printed template on top. Check the printed template to be sure of size before printing all arcs.
The weight of paper used and the stitch length may be adjusted. The paper should be heavy enough to withstand printing and handling, and the stitching should withstand handling and paper removal. We encourage you to experiment to see what options are best for you.