Welcome to Quilt Street!
Hidden Stars Block

Hidden Star Block

DIFFICULTY LEVEL ‣ INTERMEDIATE

FINISHED BLOCK SIZE: 20″ X 20″

This block looks more complicated than it really is. We break it down into half-square triangles, Flying Geese units, and sew-and-flip elements. The resulting 20″ finished size is satisfying, in that it is a large block for your efforts. It only takes a few blocks sewn together to make a quilt. Check out our quilt of the same name to see how it looks! 

Instructions:

SPECIAL INSTRUCTIONS:

Read through entire pattern before beginning project. Use ¼” seam allowances with fabric right sides together. Pressing arrows are included with illustrations. Basic quiltmaking supplies are assumed. Fabric requirements include extra yardage for shrinkage and insurance. If working with directional prints, you may want to begin with more fabric than called for. 

WOF = width of fabric 

LOF = length of fabric 

HST = half-square triangle 


FABRIC:

Fabric A: ½ yard tan print 

Fabric B: ½ yard dark tan/rose print 

Fabric C: ½ yard white solid 

Fabric D: ½ yard dark rose/tan print 


ADDITIONAL SUPPLIES:

  • Marking pencil 


CUTTING:

From Fabric A, cut: 

• (1) 8½” x 8½” square for center 

• (1) 4½” x WOF strip. Cut strip into: 

• (8) 4½” x 4½” squares for side units 

From Fabric B, cut: 

• (1) 4½” x WOF strip. Cut strip into: 

• (4) 4½” squares for center 

• (1) 2½” x WOF strip. Cut strip into: 

• (16) 2½” x 2½” squares for corners 

From Fabric C, cut: 

• (3) 2½” x WOF strips. Cut strips into: 

• (8) 2½” x 4½” rectangles 

• (28) 2½” x 2½” squares 

From Fabric D, cut: 

• (2) 4½” x WOF strips. Cut strips into: 

• (4) 4½” x 8½” rectangles for side units 

• (8) 2½” x 4½” rectangles for side units 


Block Assembly:

Referring to Diagram 1, draw a diagonal line on wrong side of (4) Fabric B 4½” squares. Place 1 marked square on one corner of Fabric A 8½” square as shown. Sew on drawn line and trim away excess fabric with a ¼” seam allowance. Repeat on opposite corner. Repeat on remaining corners to make Center Unit. 
Hidden Stars Block, Diagram 1

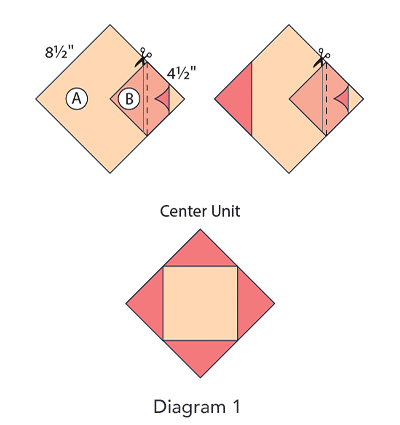
Referring to Diagram 2, draw a diagonal line on wrong side of (1) Fabric C 2½” square. Place marked square over (1) Fabric B 2½” square. Sew ¼” seam allowance on each side of drawn line. Cut in half on drawn line and press to make (2) HST Units. Make 8. Draw a diagonal line on wrong side of (1) Fabric B 2½” square. Place marked square over right end of (1) Fabric C 2½” x 4½” rectangle. Sew on drawn line and trim away excess fabric with a ¼” seam allowance. Open and press to make Left Side Rectangle. Make (4) Left and (4) Right Side Rectangles. Paying attention to orientation, lay out (2) HST Units, (1) of each Side Rectangles, (2) Fabric C 2½” squares, and (1) Fabric B 2½” square. Sew together into units; sew rows together to make Corner Unit. Make 4. 
Hidden Stars Block, Diagram 2

Referring to Diagram 3, draw a diagonal line on wrong side of (2) Fabric A 4½” squares. Place 1 marked square on one end of Fabric D 4½” x 8½” rectangle as shown. Sew on drawn line and trim away excess fabric with a ¼” seam allowance. Repeat on opposite end of rectangle to make Large Flying Geese Unit. Make 4. Repeat with Fabric C 2½” squares and Fabric D 2½” x 4½” rectangles to make Small Flying Geese Unit. Make 8. Lay out (1) Large and (2) Small Flying Geese Units as shown. Sew together to make Side Unit. Make 4. 
Hidden Stars Block, Diagram 3


Paying attention to orientation, lay out Center Unit, (4) Corner Units, and (4) Side Units (Diagram 4). Sew into rows; sew rows together to make Hidden Star Block. 

Hidden Stars Block, Diagram 4

We have a quilt pattern featuring this block!

Shopping Cart
Scroll to Top