Welcome to Quilt Street!
Oakleigh Quilt

Oakleigh Quilt Pattern

DESIGNER:

Unknown 

OWNED BY:

Rhonda Lee Lother

DIFFICULTY LEVEL ‣ ADVANCED

FINISHED QUILT SIZE:

84″ x 84″ 

This quilt was made in the 1880s in Demopolis, Alabama, and was gifted to one of our editors. It is rare to find a Lone Star quilt completed and in such good condition, despite its many years of use. A pattern meant for intermediate to advanced quilters, it was mastered by few quiltmakers in years past. All of the diamonds are on the bias, and the background triangles and squares require set-in seams. Early quiltmakers didn’t have access to the rulers and rotary cutter methods we do now, and with the bias edges, many found that their star wouldn’t lie flat in the center. One Southern superstition held that a Lone Star was bad luck if featured on a quilt by itself; therefore, you will often see appliquéd shapes surrounding it. What appears as yellow or gold on this quilt may have been green at one time. Antique green fabrics were seldom colorfast, and over the years, they often faded to either yellow or blue—whichever color was more dominant in achieving that particular green. This would have been a quilter’s best quilt, used for special occasions. 

Instructions:

SPECIAL INSTRUCTIONS:

Read through entire pattern before beginning project. Use ¼” seam allowances with fabric right sides together. Pressing arrows are included with illustrations. Basic quiltmaking supplies are assumed. Fabric requirements include extra yardage for shrinkage and insurance. If working with directional prints, you may want to begin with more fabric than called for. Pattern is based on an antique quilt and has been simplified as needed for ease of construction and may differ slightly from original. 

Appliqué templates are given without seam allowances. Print appliqué patterns at 100%, making sure your printer is set to No Scaling, and cut out on printed lines. Place right side of appliqué template onto wrong side of fabric and trace. Cut out on traced lines for fusible appliqué or with approximate ¼” seam allowances for turned-edge appliqué. If an appliqué piece is layered under another, underlap is indicated with dotted lines. 


WOF = width of fabric 

QST = quarter square triangles 


FABRIC:

Fabric A: 1¼ yard pale peach solid for star 

Fabric B: 2¾ yards red solid for star, appliqué, and binding 

Fabric C: ¾ yard yellow print for star 

Fabric D: 1 yard medium gold solid for star and appliqué 

Fabric E: 1 yard green solid for star and appliqué 

Fabric F: 4¾ yards white for star and setting blocks 

Backing: 2¾ yards 108″-wide fabric 


ADDITIONAL SUPPLIES:

  • Batting: 94″ x 94″ piece 

  • Fusible web, if desired (1 yard of 40″-wide)

  • Marking pencil or water-soluble pen 


CUTTING:

From Fabric A, cut: 

• (12) 3″ x WOF strips 

From Fabric B, cut: 

• (10) 3″ x WOF strips 

• (10) 2½” x WOF strips for binding 

• Shapes from templates for Corner Units: 

• 4 A 

• 16 B 

• 16 C 

• 16 D 

From Fabric C, cut: 

• (7) 3″ x WOF strips 

From Fabric D, cut: 

• (7) 3″ x WOF strips 

• Shapes from templates for Side Units: 

• 6 E 

• 2 F 

• 2 F reversed 

• 2 G 

From Fabric E, cut: 

• (7) 3″ x WOF strips 

• Shapes from templates for Side Units: 

• 6 E 

• 2 F 

• 2 F reversed 

• 2 G 

From Fabric F, cut: 

• (1) 37″ x WOF strip. Cut strip into: 

• (1) 37″ x 37″ square. Cut in half diagonally twice to make 4 Side QSTs. 

• (4) 26″ x WOF strips. Cut strip into: 

• (4) 26″ x 26″ squares for Corners 

• (6) 3″ x WOF strips. 

Block Assembly

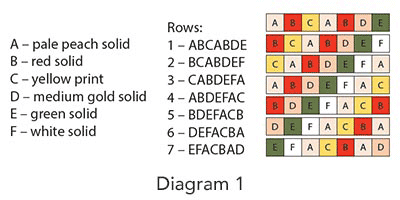
Refer to Diagram 1 to gather fabric strips to use for each row set. Strips sets are as follows: 

Oakleigh Quilt Block, Diagram 1

Referring to Diagram 2, sew together first set of strips, offsetting strips by 2½” as shown. Press all seams toward first strip in each set. Using 45º marking on a wide ruler, cut pieced strips 3″ wide for Row Set 1. Cut 8 strips. Label strip set by row. 

Oakleigh Quilt Block, Diagram 2

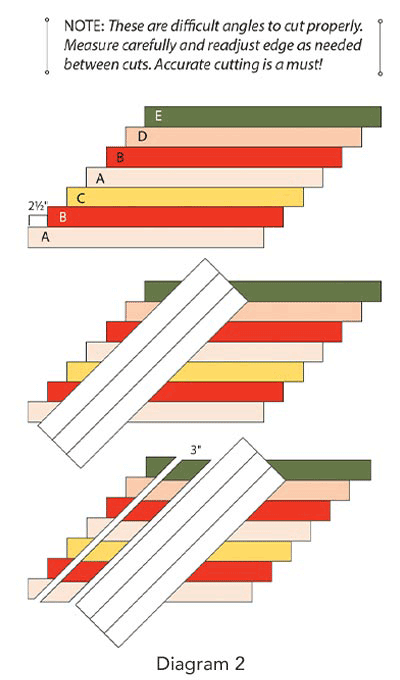
Repeat to construct and cut Row Sets 2–7. 

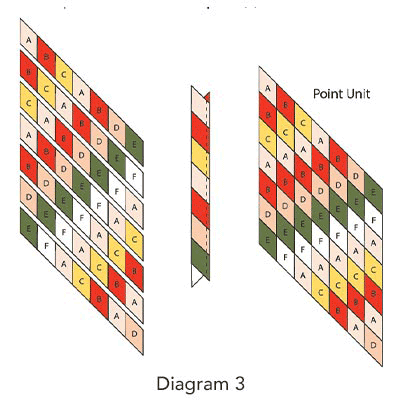
Lay out 1 pieced strip from each row set as shown in Diagram 3. Double-check fabric placement. Flip Row 2 over Row 1, right sides together, aligning seams, and pinning in place. Sew together and press seams to second row. Repeat for 7 rows to complete (1) Point Unit. Make 8. 

Oakleigh Quilt Block, Diagram 3

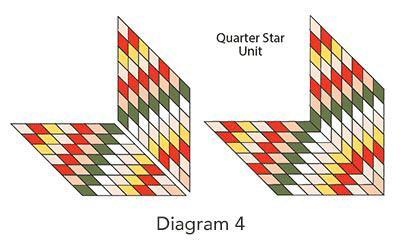
Referring to Diagram 4, lay out (2) Point Units. Sew together as above to make Quarter Star Unit. Make 4. 

Oakleigh Quilt Block, Diagram 4

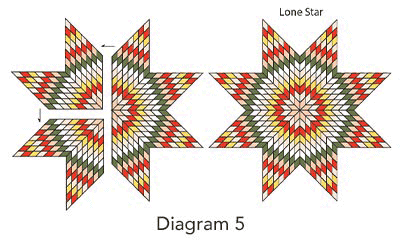
Referring to Diagram 5, lay out (4) Quarter Star Units. Join to make Lone Star. 

Oakleigh Quilt Block, Diagram 5

Appliqué:

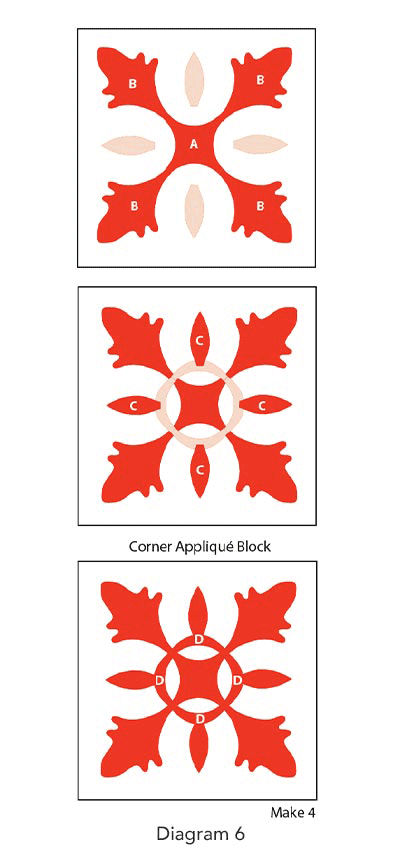
Take (1) Fabric F 26″ Corner Square and fold it in half vertically and horizontally to find center. Referring to Diagram 6, center (1) Template A piece on (1) 26″ Corner Square. Position (4) Template B oak leaves as shown and then (4) Template C leaves as shown. Appliqué or fuse in place. Position (4) Template D arcs as shown. Appliqué or fuse in place to complete (1) Corner Appliqué Block. Make 4. 

Oakleigh Quilt Block, Diagram 6

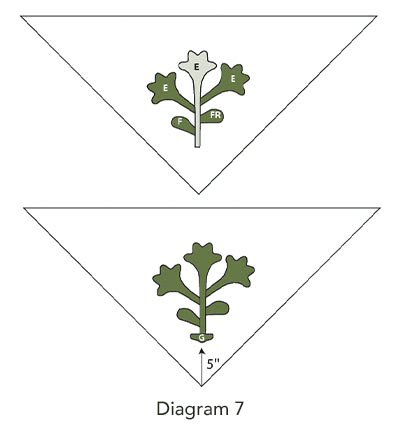
Take (1) Fabric F QST and gently fold it in half to find center. Referring to Diagram 7, center (1) Template E flower with long stem end 5″ from inner finished point. Pin in place, but do not secure. Position (2) Template E side flowers, (1) Template F leaf, and (1) Template F Reversed leaf as shown. Remove center Template E flower for now. Appliqué or fuse in place, trimming stems to length as required. Replace Template E flower and secure, covering stem ends. Position (1) Template G base and then secure in place to complete (1) Side Appliqué Unit. Make 2 green and 2 gold Side Appliqué Units. 

Oakleigh Quilt Block, Diagram 7

Quilt Assembly and Finishing

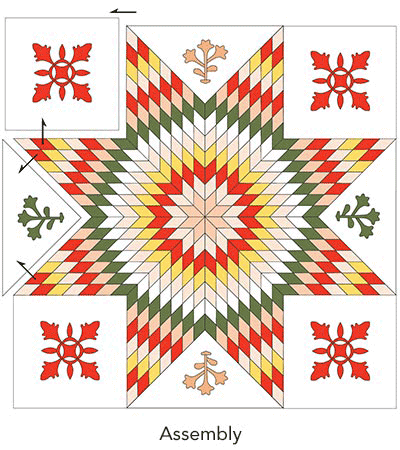
Referring to Quilt Assembly Diagram on page 6, lay out Lone Star with Corner Appliqué Blocks and Side Appliqué Units. Sew with set-in seams to complete Oakleigh Quilt Top. Trim edges to square quilt, leaving ¼” outside star points for binding. 

Oakleigh Quilt Block, Assembly

  1. Center and layer backing, batting, and quilt top together to make a quilt sandwich; baste layers together and quilt as desired. 

  2. Trim batting and backing even with quilt top. 

  3. Using diagonal seams, make Fabric B binding from (10) 2½” x WOF strips. Fold binding in half lengthwise, matching wrong sides; press length. Sew binding to quilt top and miter corners; join binding ends as desired. Press binding away from quilt top and fold over quilt’s edge to back of quilt. Hand-stitch binding in place to finish. 

Shopping Cart
Scroll to Top